
Parent Guide: use the JARASNA app step by step
Everything you need, from activating your account for the first time to adding your car and the other guardian, to picking up your child safely every day — with real screenshots from the app.
Welcome to JARASNA
JARASNA connects you with your child’s school to organise pickup and handover safely. When you reach the school you tap “I’m Here”; the school prepares your child, a designated staff member checks a daily code before handing them over, and every step is recorded. Alongside pickup, the app brings attendance, school messages, Class Pulse, appointments and more into one place.
What you need to get started
Your mobile number as registered with the school — the school creates your account; there is no self sign-up.
A smartphone that can receive text messages (SMS) for the verification code.
The JARASNA app: search for “JARASNA” in your phone’s store, or open app.jarasna.com in a browser.
Good to know: The pictures in this guide are real screenshots of the JARASNA app taken from a demo school; all names and numbers are fictional. Some screens may differ slightly depending on the services your school has enabled.
Contents
Activate your account for the first time
Once the school adds you with your mobile number, your account is ready to activate. You only do this once, to choose your own password.
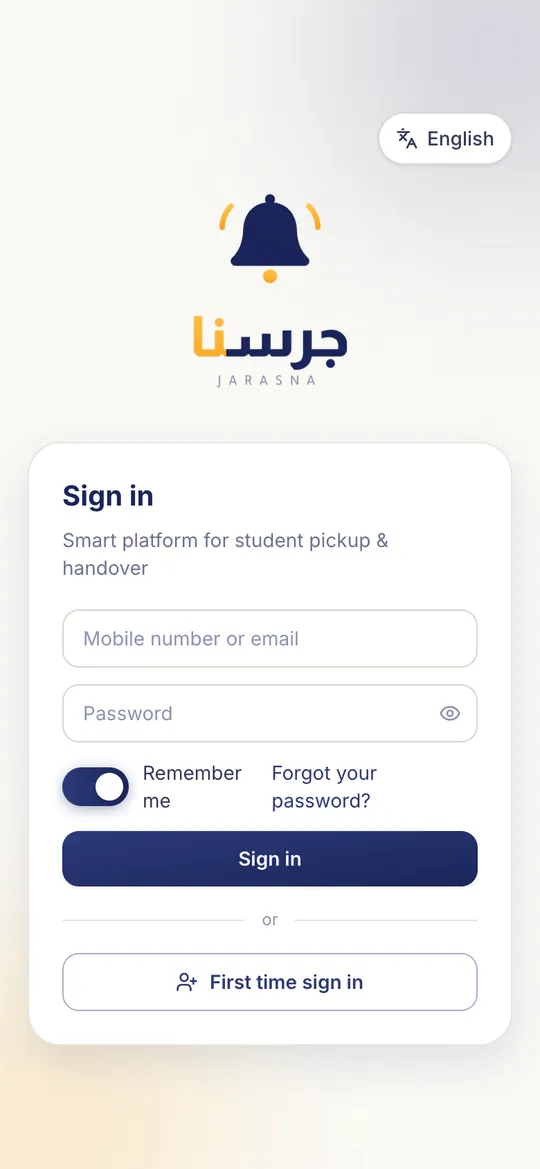
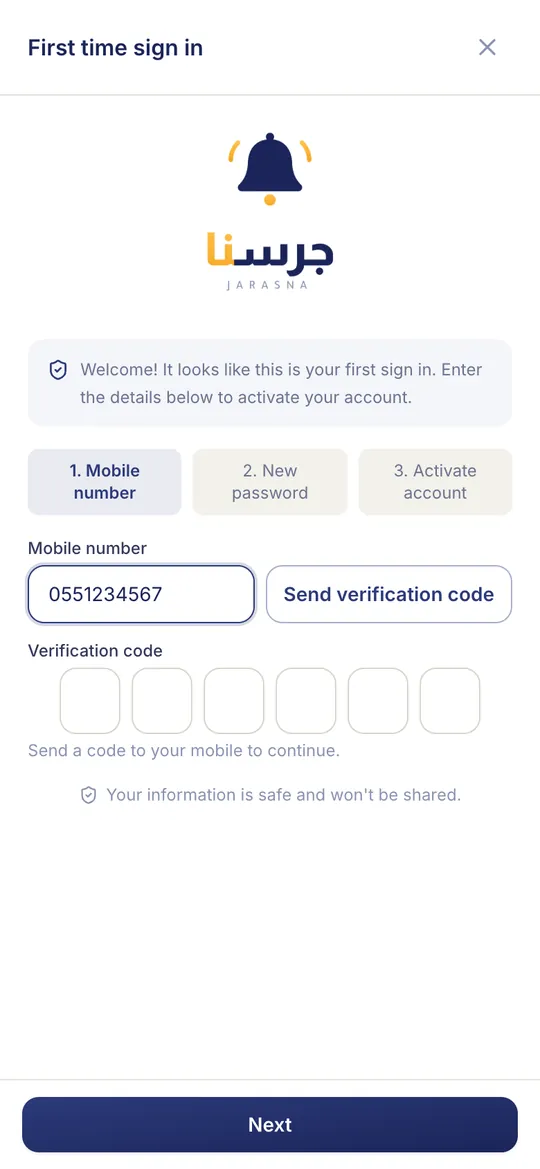
- Open the app and tap “First time sign in” below the Sign in button.
- Enter your mobile number (e.g. 05xxxxxxxx) and tap “Send verification code”.
- Enter the 6-digit code you receive by SMS and tap “Next”. You can request a new code after 60 seconds.
- Choose a new password and confirm it. The requirements are shown and checked as you type.
- Add your email if you wish (optional) — it helps you recover your password later.
- Review the “Parent acknowledgment”: tick both statements, then tap “Accept and activate parent access”.
- Tap “Activate account” — you go straight to the home screen and see your children.
Tip: Password rules: at least 8 characters, one uppercase letter, one lowercase letter and at least one symbol such as ! # or @.
Good to know: If you see “No account is registered with this mobile number”, contact your school to confirm the number they have on file.
Signing in and resetting your password
After activation you sign in each time with your mobile number (or email) and password.
- Enter your mobile number or email, then your password, and tap “Sign in”.
- Turn on “Remember me” to stay signed in on your device.
- Forgot your password? Tap “Forgot your password?” and choose “By SMS” or “By email”.
- By SMS: enter your mobile → “Send verification code” → enter the code → choose a new password → “Update password”.
- By email: enter your email → “Send reset link” → open the link in your inbox and set a new password.
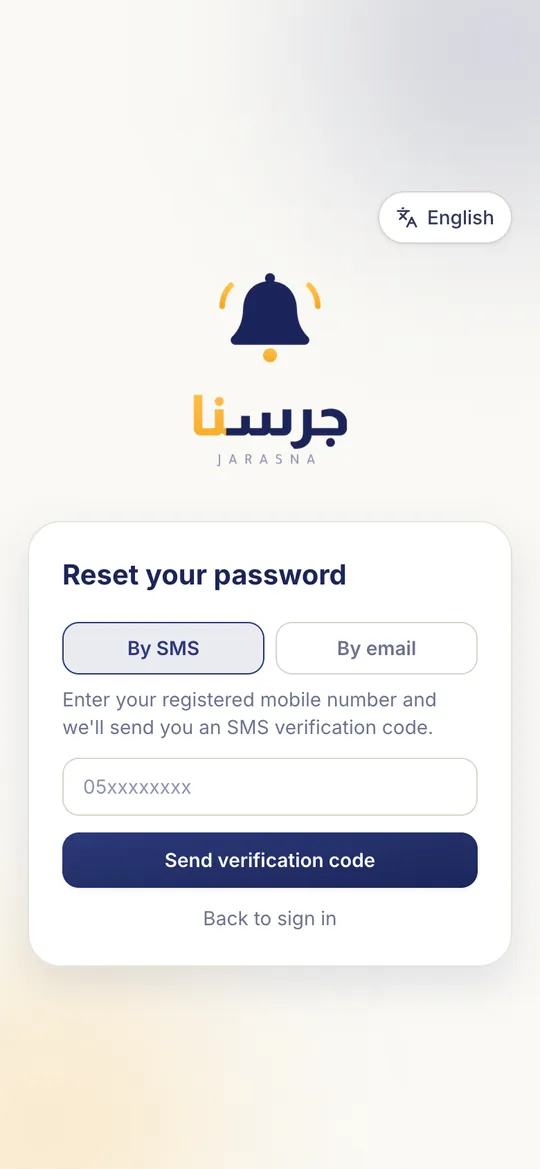
Tip: You can switch the screen between Arabic and English with the button at the top of the sign-in page.
Good to know: “Account not activated” means you have not finished activation yet — use “First time sign in”.
A tour of the home screen
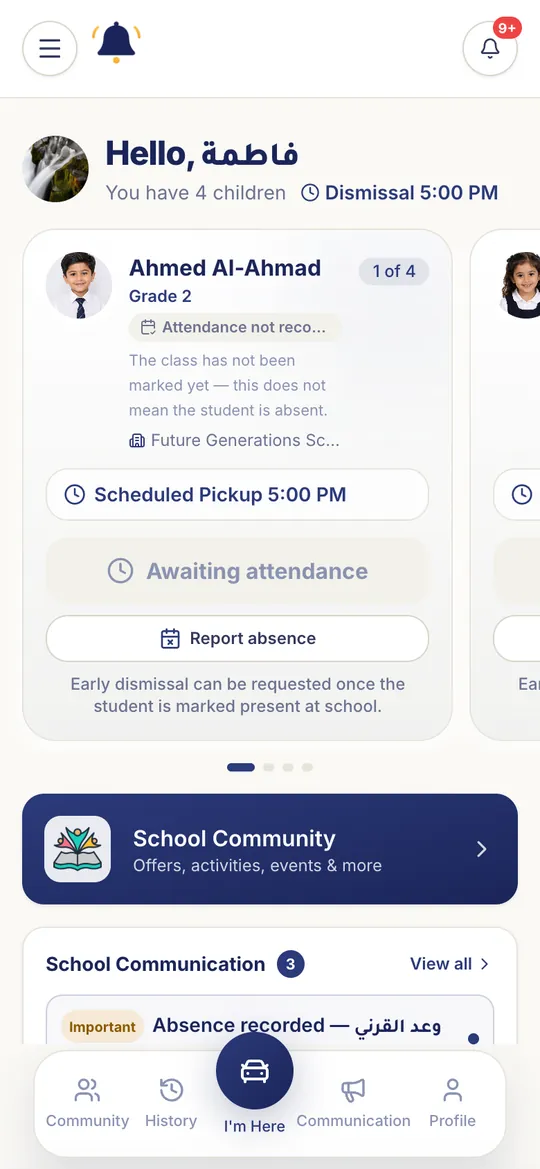
The home screen is your everyday place: one card per child, the pickup time and the “I’m Here” button.
- At the top: your greeting, how many children you have and today’s pickup time.
- Swipe the cards left and right to move between your children. If they attend more than one school or branch, the school and branch appear above each card.
- Each card shows the grade and class, today’s attendance, the “Scheduled Pickup” time and, if your school uses it, your approved pickup car.
- The bottom bar: Community · History · “I’m Here” in the middle · Communication · Profile.
- The menu ☰ opens every section: Children’s reports, Permanent receivers, Temporary permits, Class Pulse, Meetings and more. The bell shows your notifications.
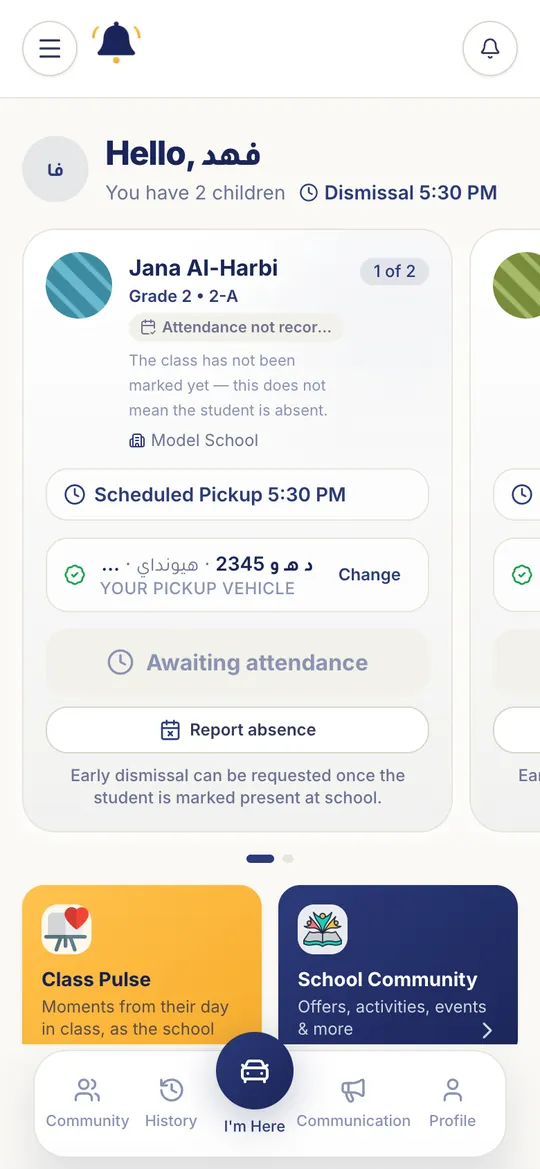
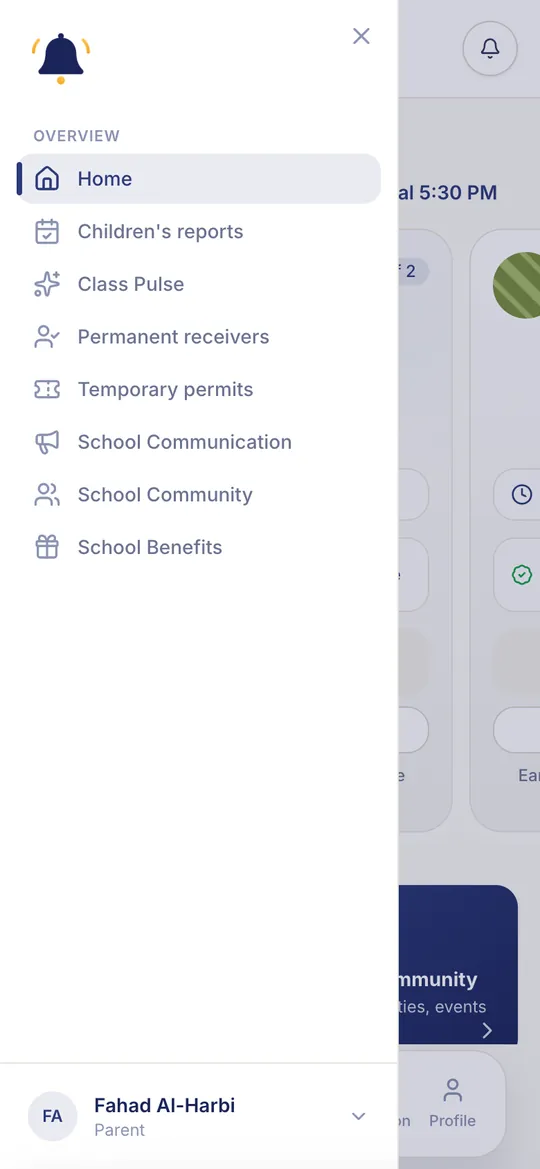
Good to know: “Attendance not recorded” does not mean your child is absent; it means the class has not been marked yet.
Add your car
Your car helps school staff recognise you at the gate. Some schools require an approved car before you can request pickup.
- Tap “Profile” in the bottom bar and scroll down to “My cars”.
- Tap “Add car”.
- Enter the plate (Arabic or English letters — one is enough), then the brand, model year and colour.
- Tap “Save Vehicle”.
- Tap “Set as approved pickup vehicle” so it gets the “Approved” badge.
- Add a photo with the camera icon; you can edit or delete the car at any time.
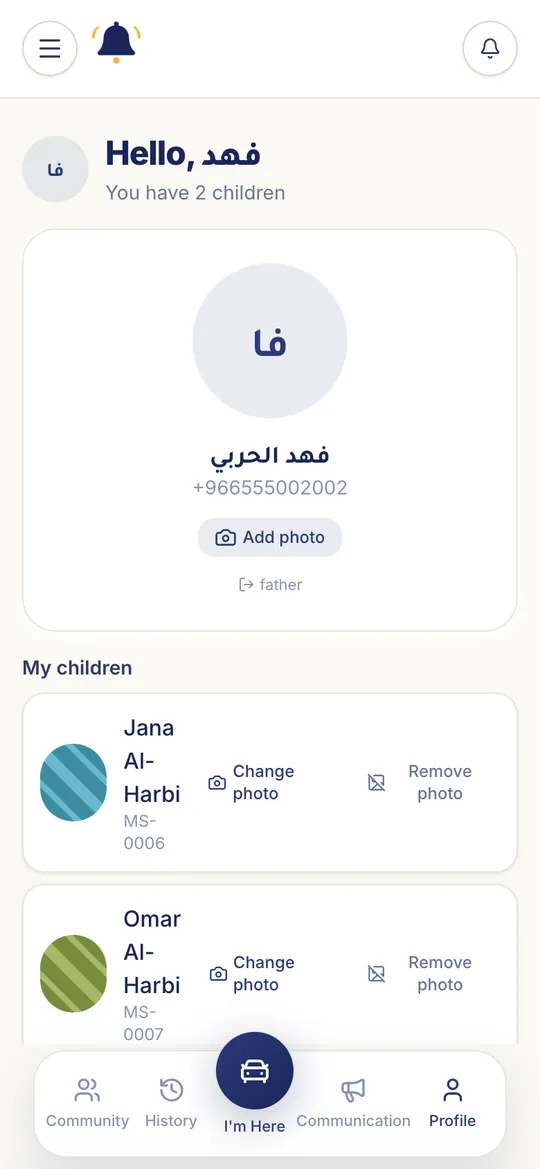
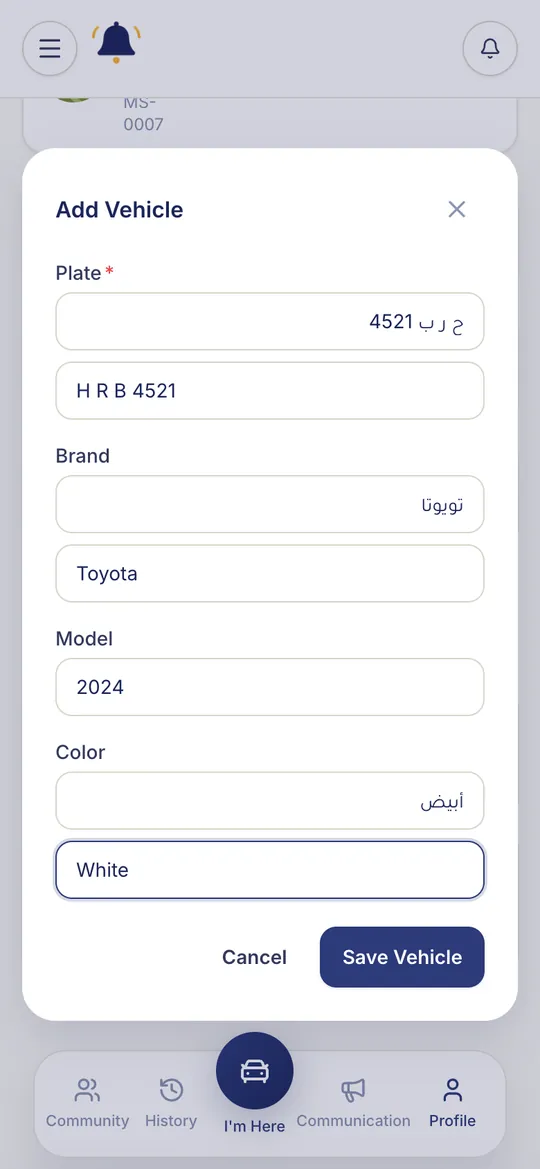
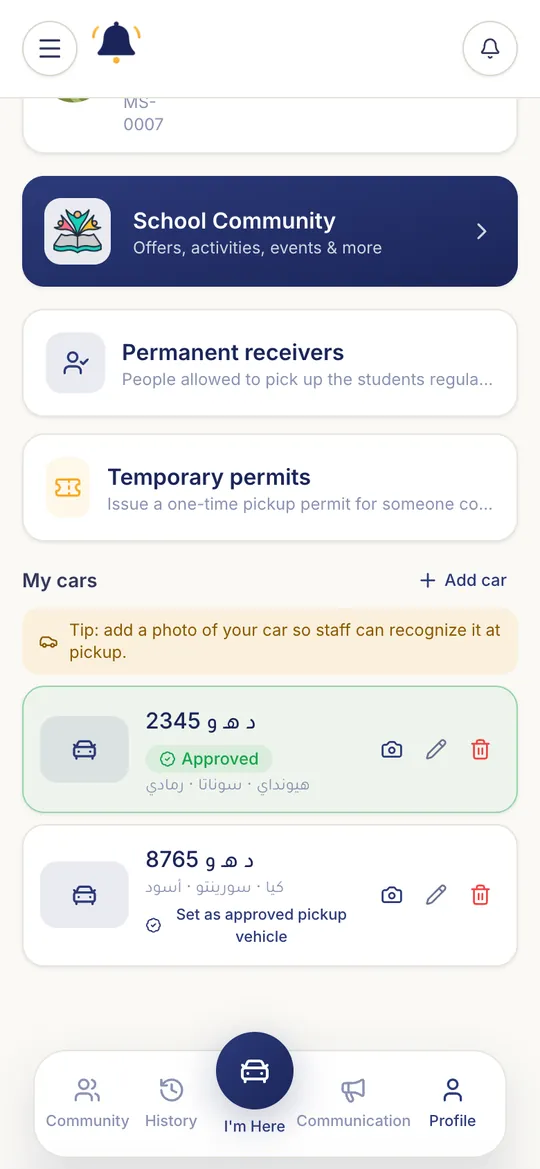
Tip: Add a photo of your car so staff can recognise it quickly at pickup.
Tip: If you have more than one car, change today’s pickup car with “Change” on your child’s card.
Add the other guardian
You can add your child’s other guardian (for example the mother or father) so they get their own JARASNA access.
- Open the menu ☰ → “Profile Settings”, then tap the “Other guardian” section.
- Tap “Add the other guardian”.
- Enter the full name in Arabic (required) and English (optional), the mobile number, and choose the relationship.
- Add the ID/Iqama number and email if you wish (optional), then tick the children to link.
- Tap “Review”, check the details carefully, then tap “Confirm and add”.
- The other guardian then signs in with “First time sign in” using the number you entered and chooses their own password.
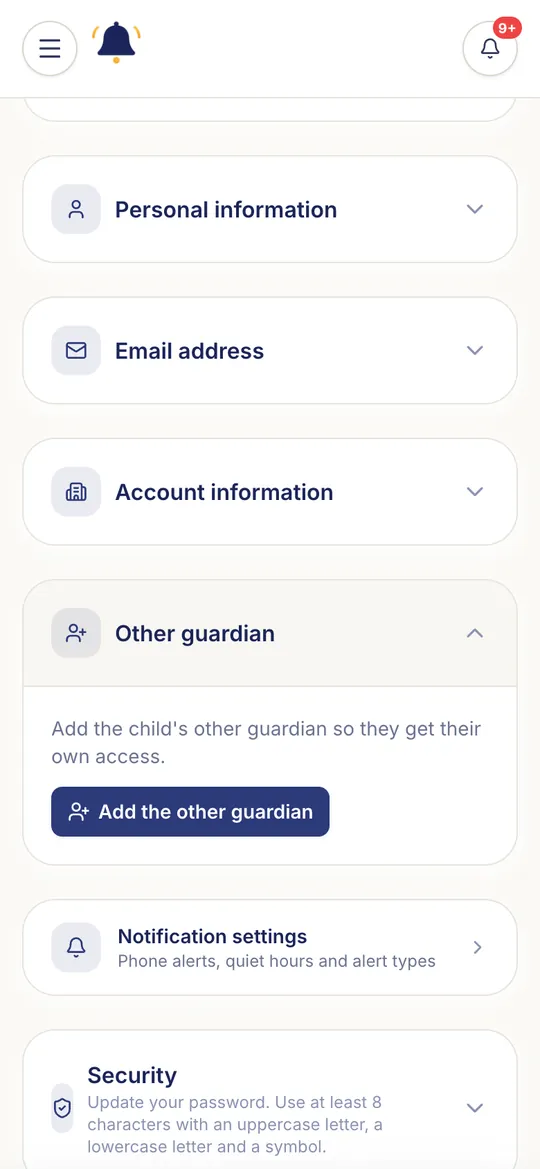
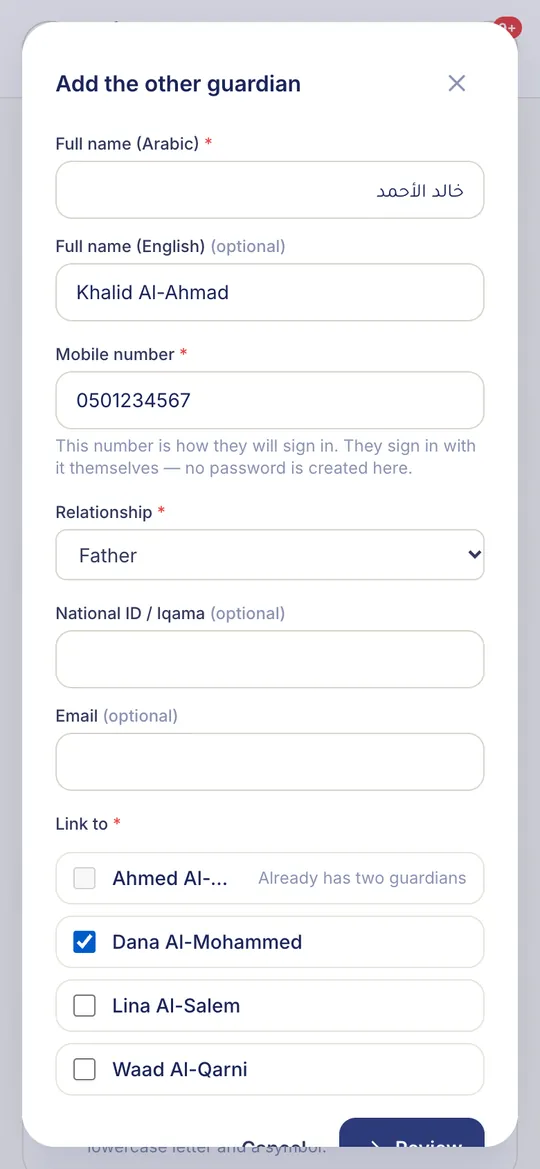
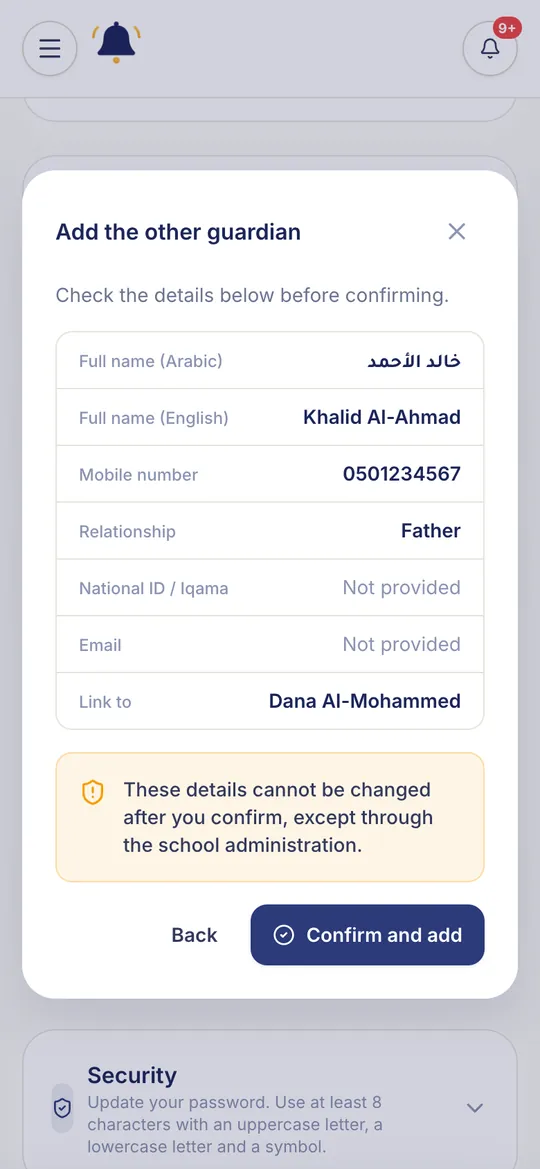
Important: The details cannot be changed after you confirm, except through the school administration — check them carefully.
Good to know: This option appears if your school enables it. Each child can have at most two guardians; “Already has two guardians” means no one else can be added. No password is created here.
Picking up your child: “I’m Here”
This is JARASNA’s core feature: tell the school you have arrived with one tap and follow your child’s preparation live.
- When you arrive at pickup time, swipe to your child’s card and tap “I’m Here”.
- If your school checks that you are nearby, “Confirm you’ve arrived” appears the first time; tap “Allow location”. Your location is read once, only at that moment, and never tracked in the background.
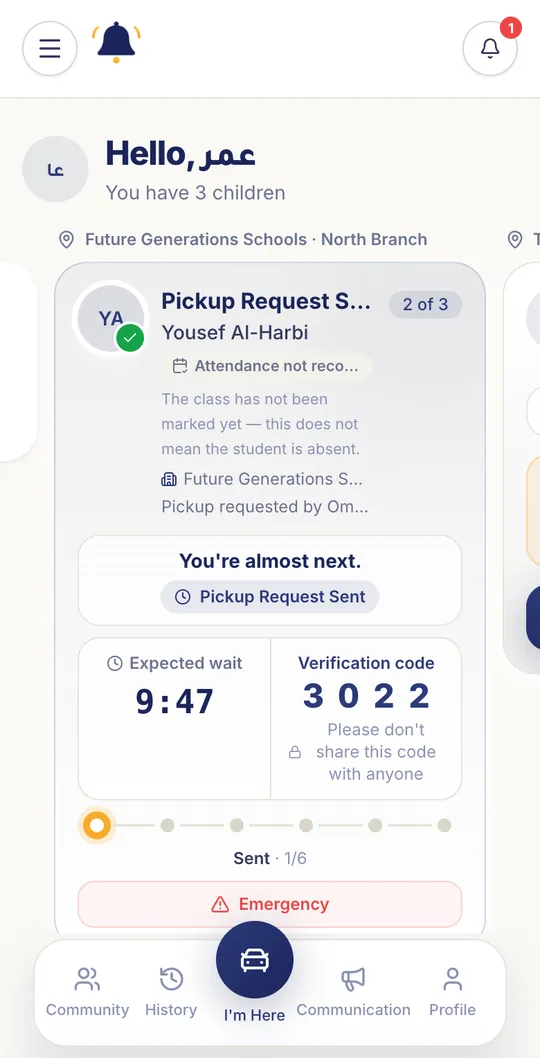
- The request is sent right away: you see your place in the queue, the expected wait and your child’s “Verification code” for today.
- Follow the progress bar: Sent → Preparing → Ready for pickup → Delivered. You get a notification at every change.
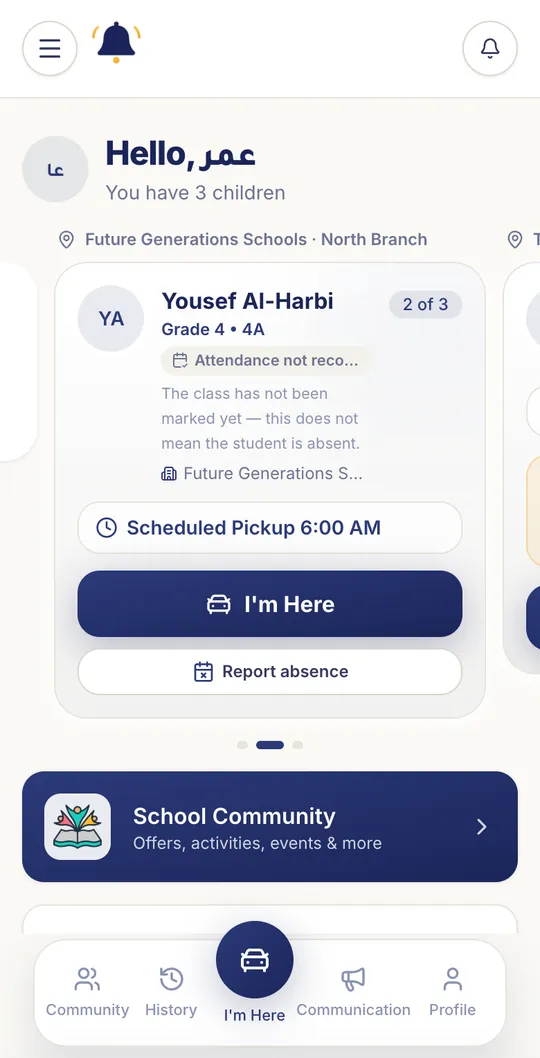
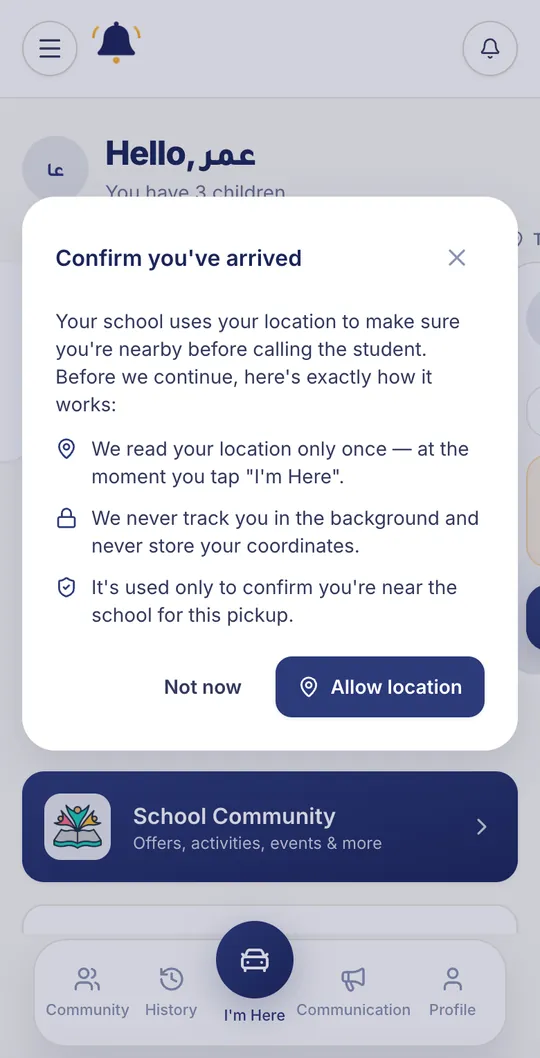
Important: Show the verification code only to the guard or supervisor at handover. Please do not share it with anyone.
After the handover, and special cases
Once your child is handed over the card turns green and shows the time and who received them.
- “Your Child Has Been Picked Up”: a final confirmation with the handover time, saved in History.
- Didn’t receive your child although it shows delivered? Tap “I have not picked up the student”, then “Escalate to handover supervisor”.
- The “Emergency” button during a request sends an urgent alert to the school with an optional note (if your school enables it).
- Early pickup: before the usual time the button becomes “Request Early Pickup”. Pick a reason (sick, family emergency, appointment, other), then “Send for approval”.
- If a request is rejected or not completed, you can “Resend Pickup Request” with a reason.
What does the button say?
- I’m Here
- Ready to send now.
- Pickup starts at …
- It is not time yet.
- Awaiting attendance
- Your school requires attendance to be marked first.
- Pickup closed today
- No pickup today.
- Pickup time is over
- Today’s pickup window has ended.
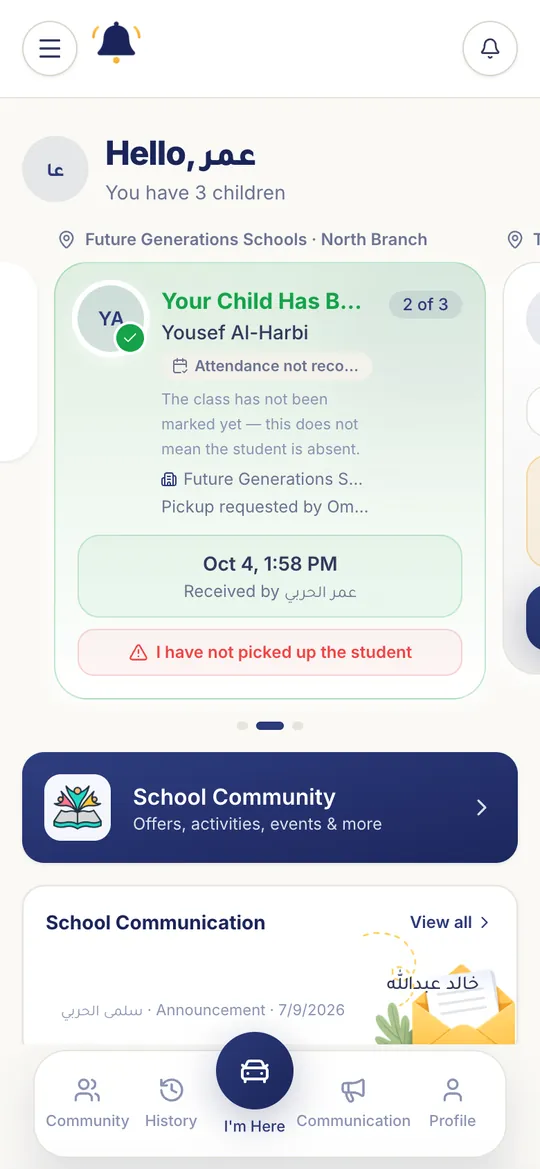
Good to know: Some steps depend on your school’s pickup method; for example you may be asked to confirm receipt yourself with “Confirm student pickup”.
Reporting an absence
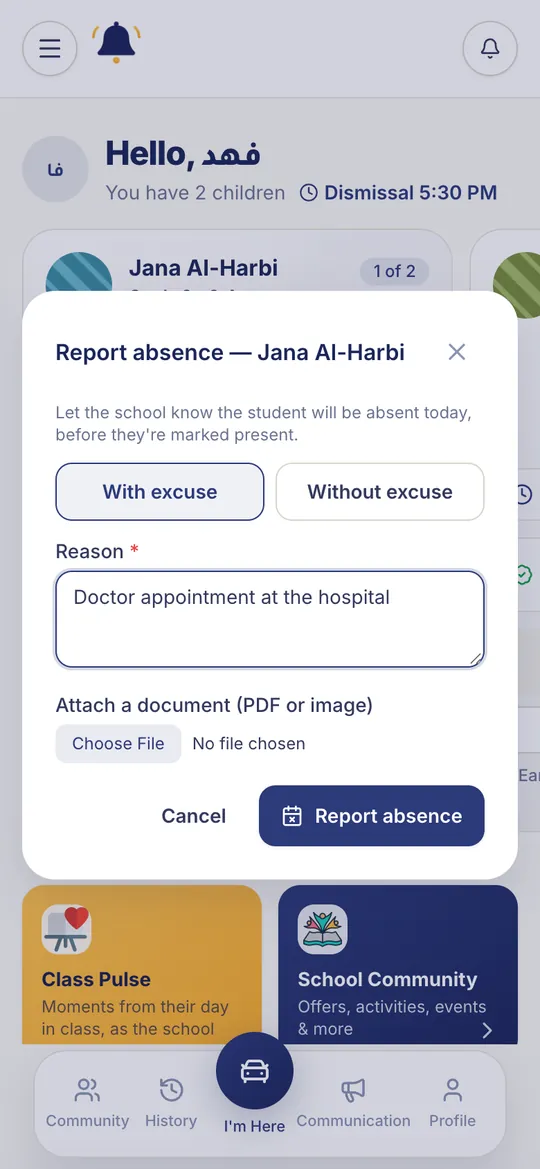
Let the school know in advance if your child will be absent, with or without an excuse.
- On your child’s card tap “Report absence”.
- Choose “With excuse” or “Without excuse”.
- Write the reason and attach a document if you have one (PDF or image up to 5 MB), such as a medical note.
- Tap “Report absence”.
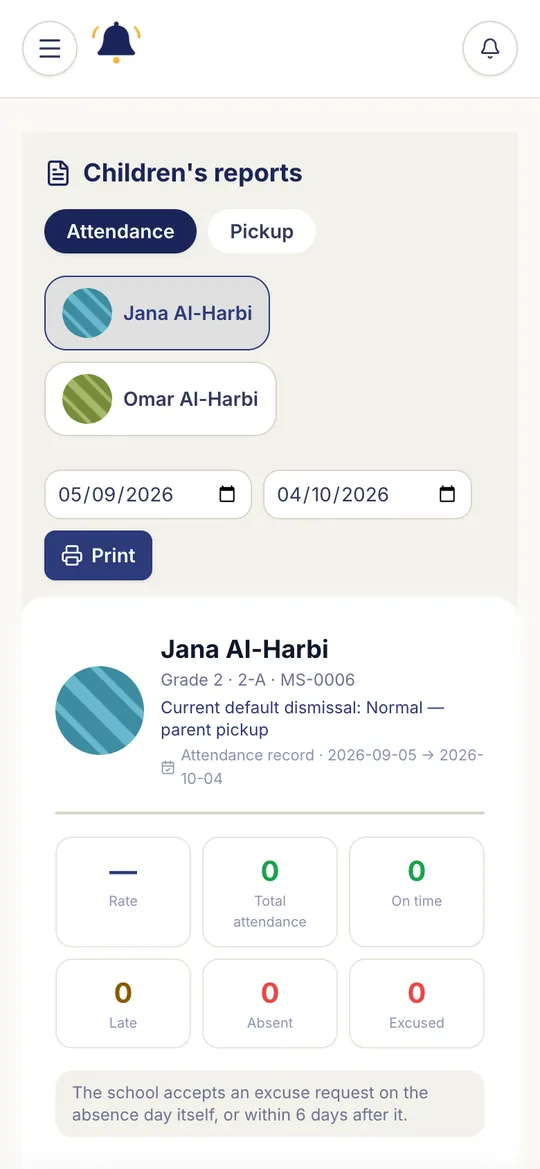
- You can also “Request excuse” for a past absence from Children’s reports → Attendance, within the period your school allows.
Good to know: If your child is marked absent today, pickup cannot be requested. Attendance features appear if your school has them enabled.
Permanent receivers
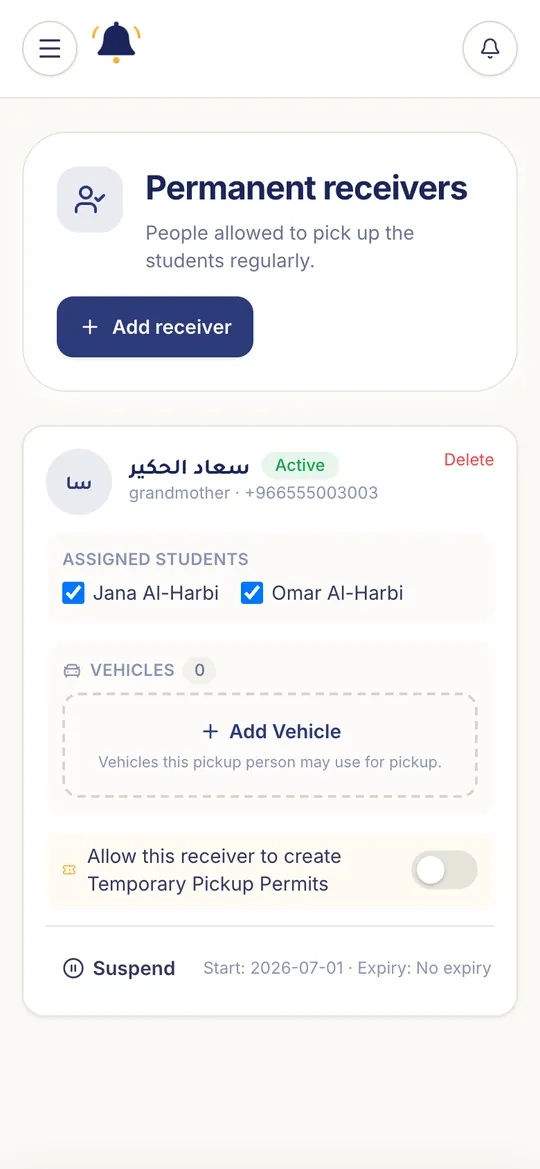
People you trust (a grandparent, uncle or driver) who are allowed to pick up your children regularly.
- From the menu ☰ choose “Permanent receivers”, then tap “Add receiver”.
- Enter the full name and mobile number (required), the relationship, and the ID number and email (optional).
- Select which children this person may pick up.
- Optionally allow them to “create Temporary Pickup Permits”, then tap “Add receiver”.
- From the receiver’s card you can add their vehicle, “Suspend” them temporarily, or “Delete”.
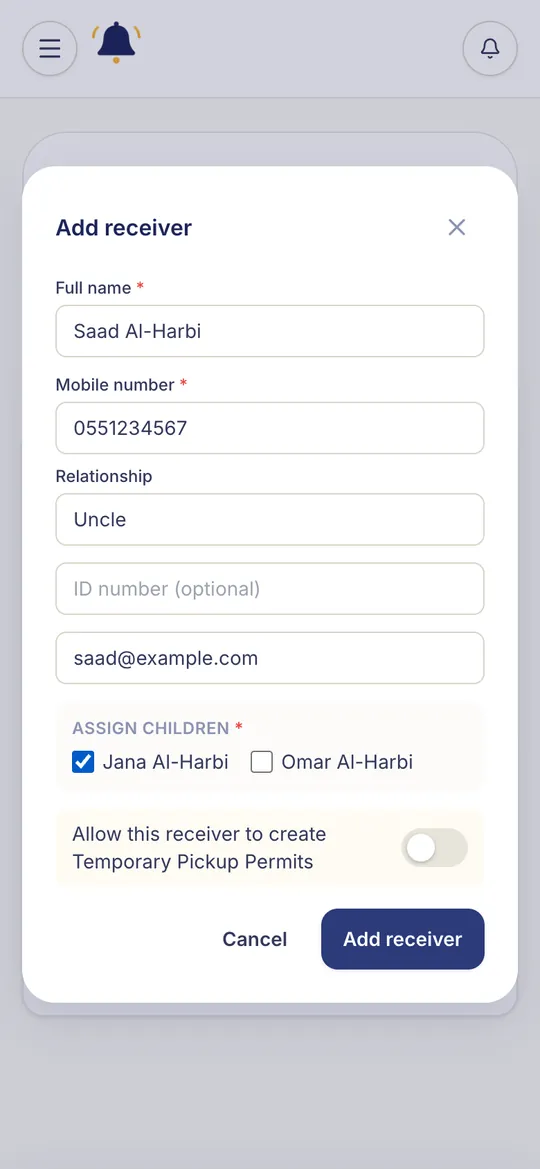
Good to know: You can have up to 2 permanent receivers. Some schools turn off adding receivers from the app — temporary permits remain available.
Temporary permits
A one-time permit for someone collecting your child today only — a relative or neighbour in an emergency, for example.
- From the menu ☰ choose “Temporary permits”, then tap “Create permit”.
- Select the student(s) (from the same branch).
- Enter the temporary receiver’s full name and mobile, choose the relationship (driver, relative, neighbour…), and the ID number if you wish.
- Set the valid date and expiry time, then tap “Create & open PDF”.
- Share the permit with the receiver: it contains the “Temporary Permit Number” to give the guard on arrival, the “Delivery confirmation number” and a QR code scanned at the gate.
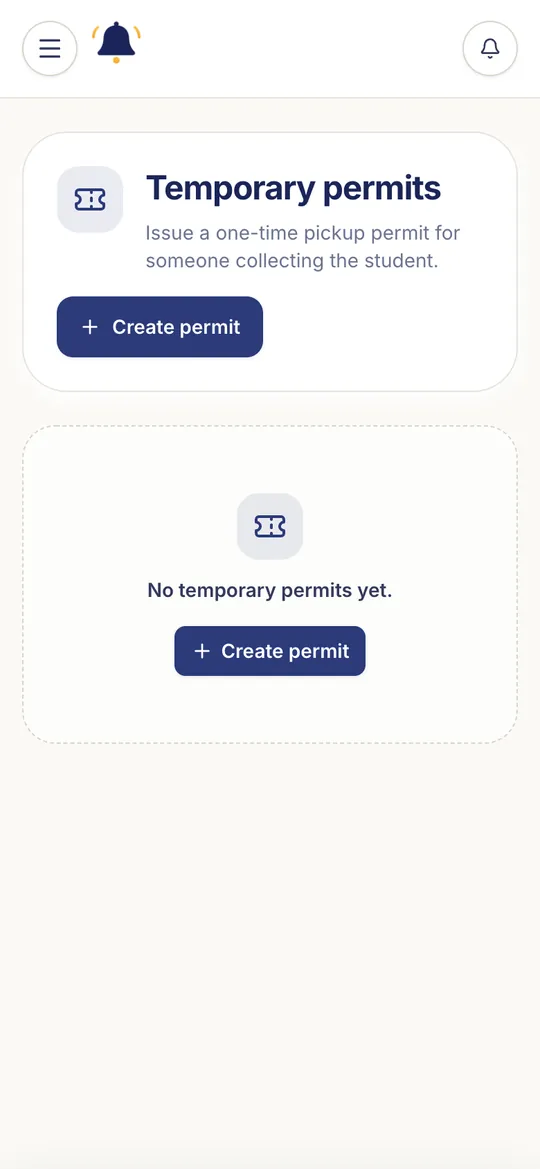
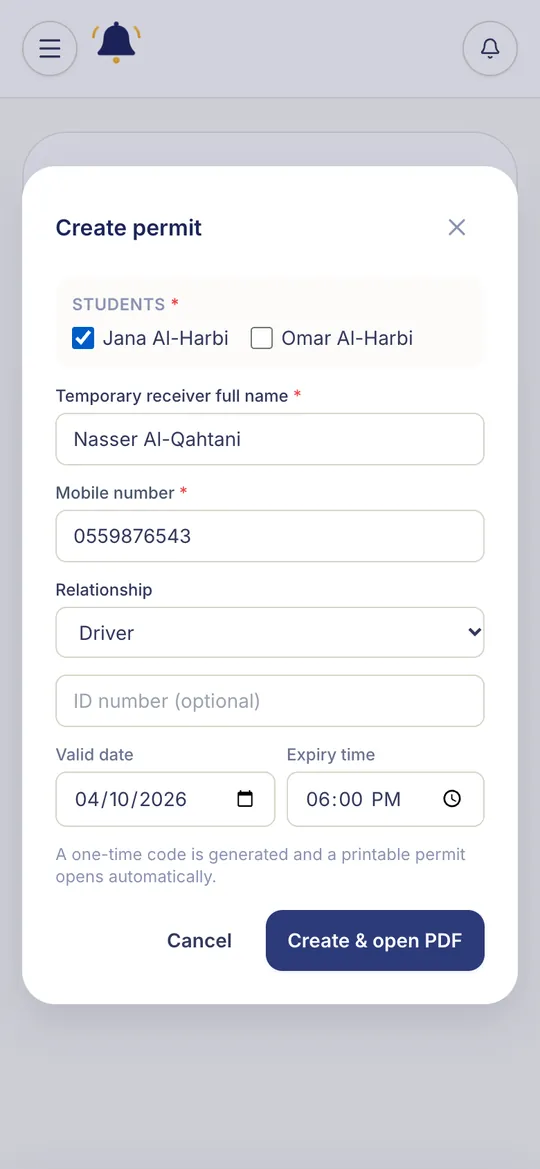
Important: A permit is valid for one pickup only, on its date. You can “Cancel permit” at any time before it is used.
Tip: You can download a permit again with “Download PDF” on its card.
History and children’s reports
Every pickup and every attendance day is kept for you to review at any time.
- Tap “History” in the bottom bar for your pickup history: who sent the request and when, who received the child and when, and the type.
- Menu ☰ → “Children’s reports”: pick a child, then the “Attendance” or “Pickup” tab.
- Change the period with the two date fields and tap “Print” to print or save the report.
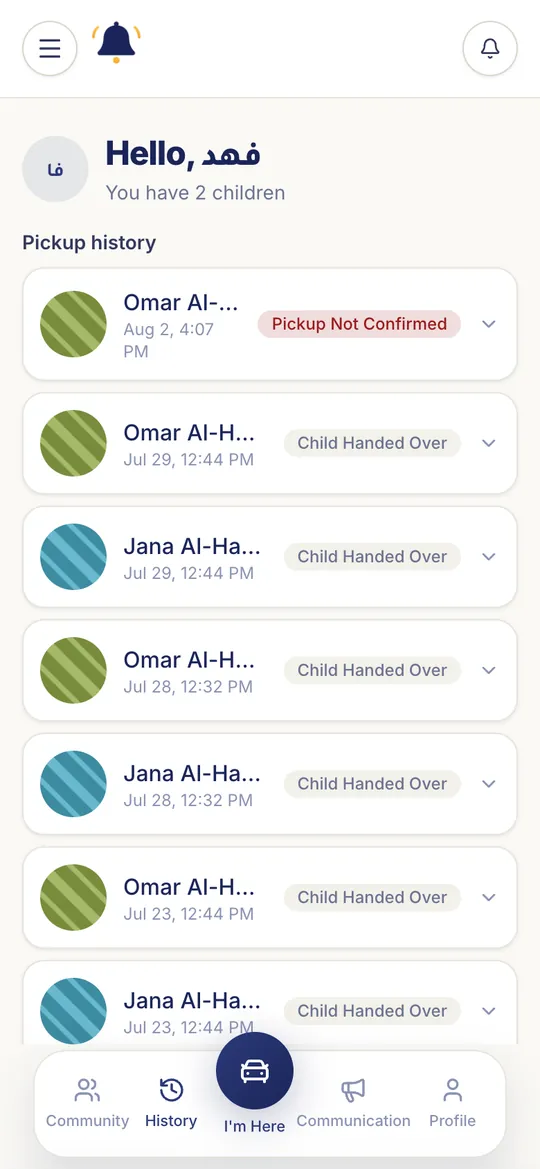
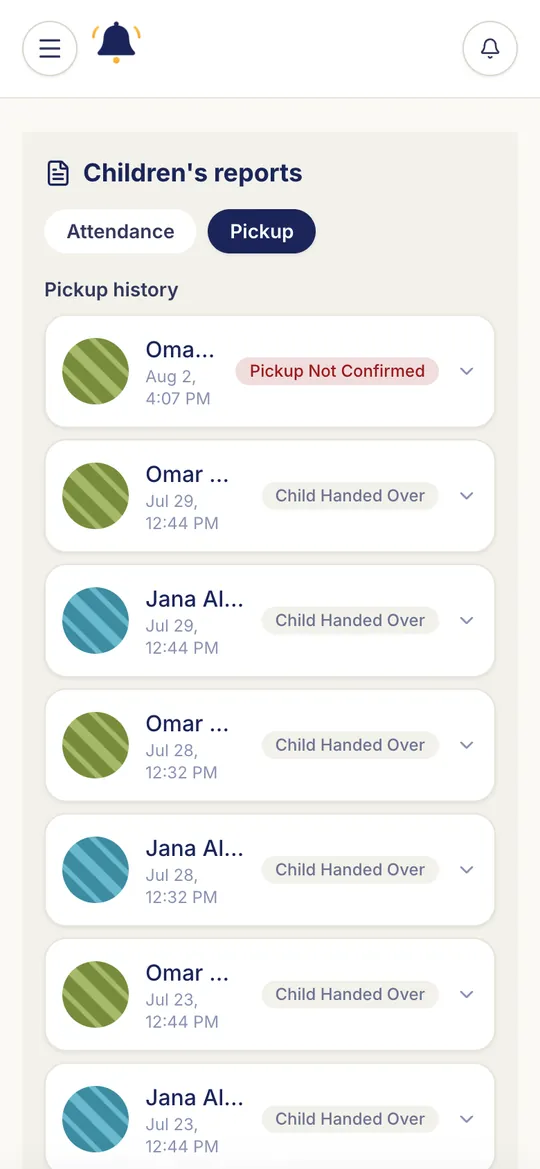
Tip: Tap any entry in History to see its full details.
School Communication and Class Pulse
School announcements and messages arrive in one place, and you can see moments from your child’s day in class.
- Tap “Communication” in the bottom bar. Use the filters: All · Unread · Action required.
- Open a message to read it. Some need a response — “Acknowledge” or “Approve / Do not approve” — and may include a link or PDF.
- “Class Pulse” from the menu: class photos, achievements, homework and lessons, for today or this week.
- On homework tap “Confirm read”, then “Mark as done” when your child has finished it.
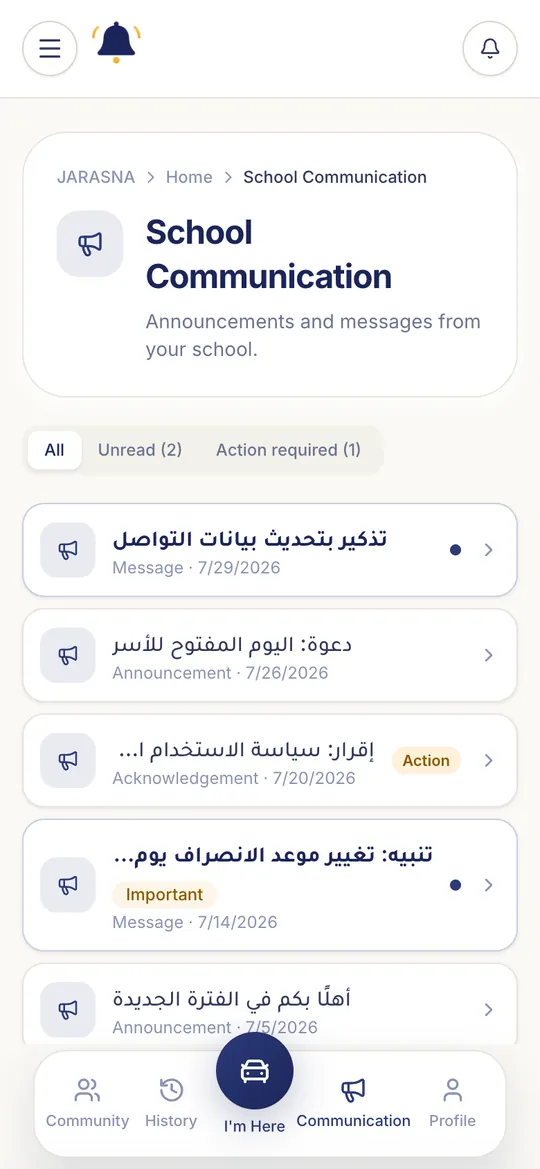
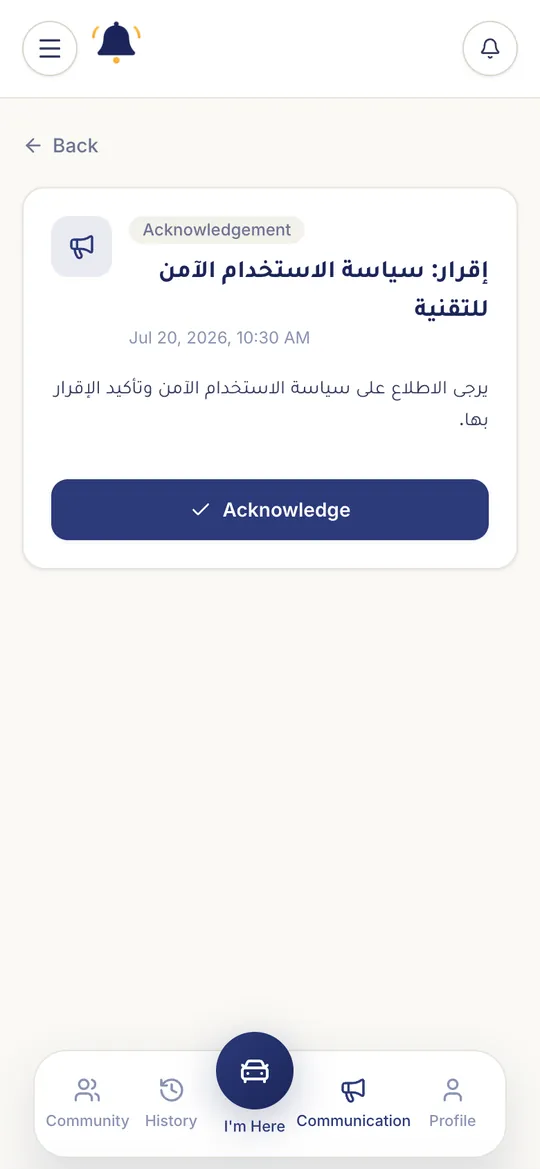
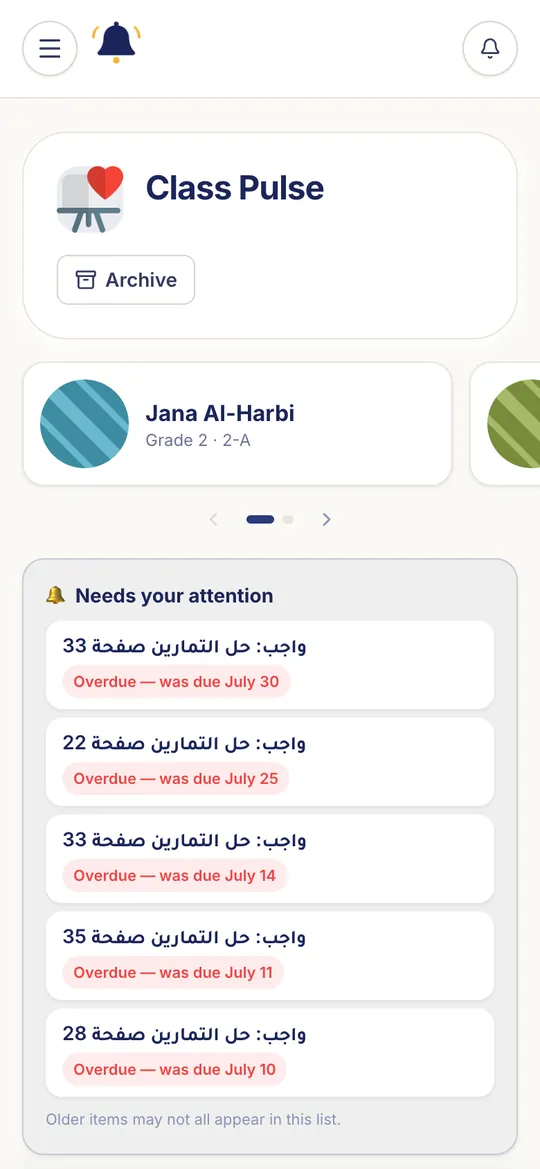
Good to know: Class Pulse and Messages with teachers appear if your school enables them.
Meetings, School Community and Benefits
Book a meeting with the school, follow its events and enjoy exclusive offers for your family.
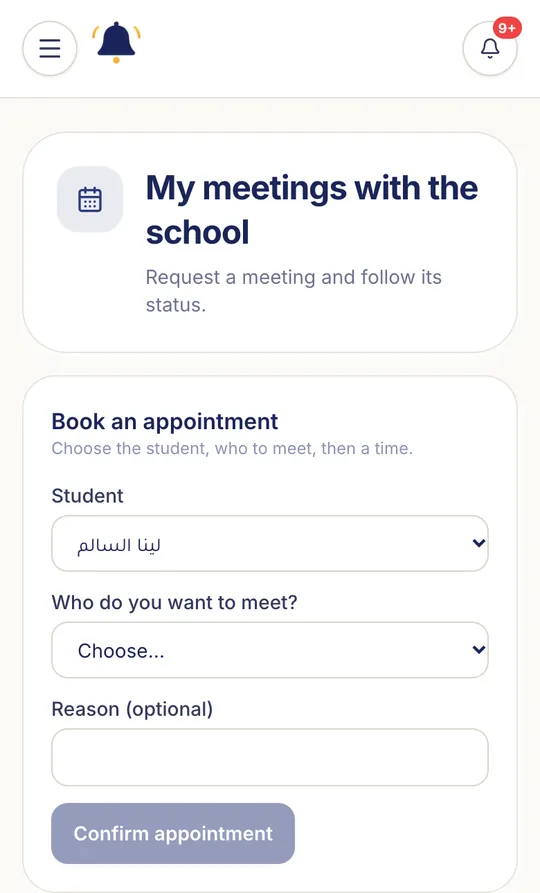
- “My meetings” from the menu: choose the student, who you want to meet and the time (in person or online), then “Confirm appointment”. It may be confirmed at once or await school approval.
- You can accept or decline a time the school proposes, or cancel your request. Online meetings are joined inside the app.
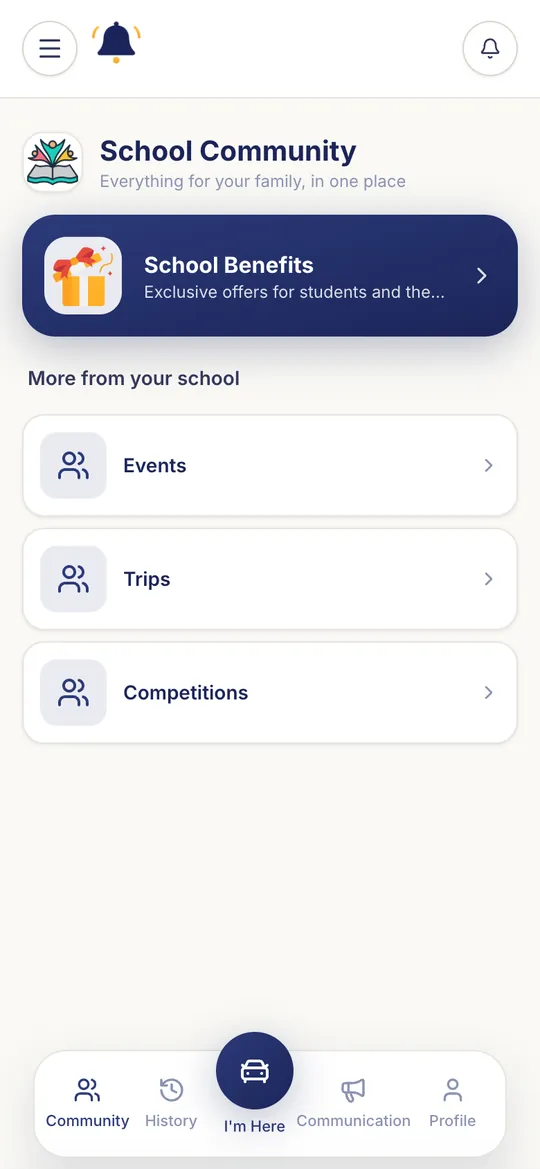
- “School Community”: events, trips, competitions and clubs, where you can “Register” your child.
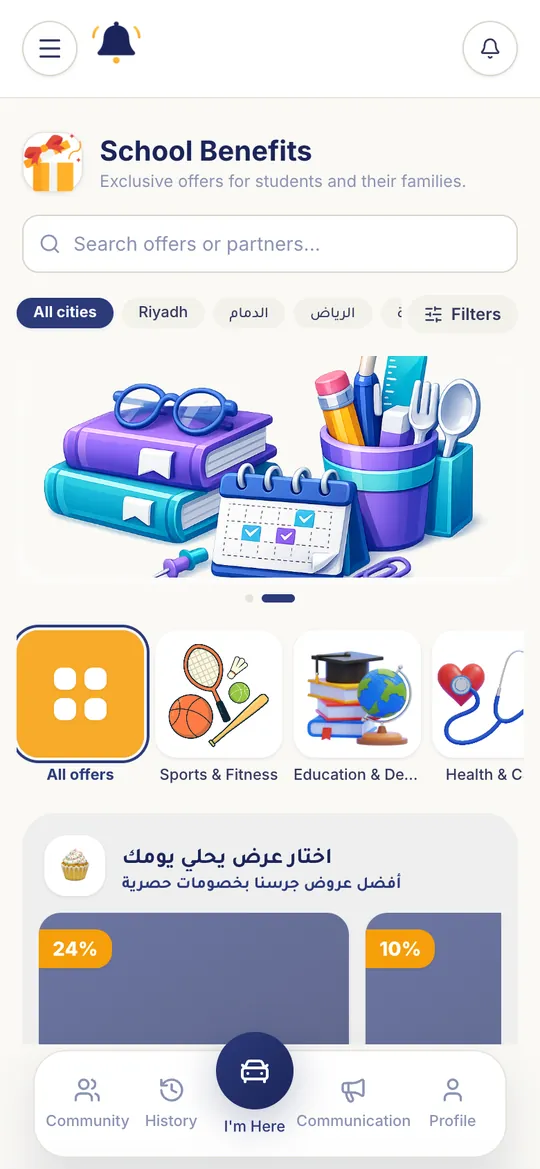
- “School Benefits”: offers and discounts from school partners. Search or filter by city and category, then open an offer to see how to redeem it.
Good to know: These sections appear if they are included in your school’s subscription.
Notifications and their settings
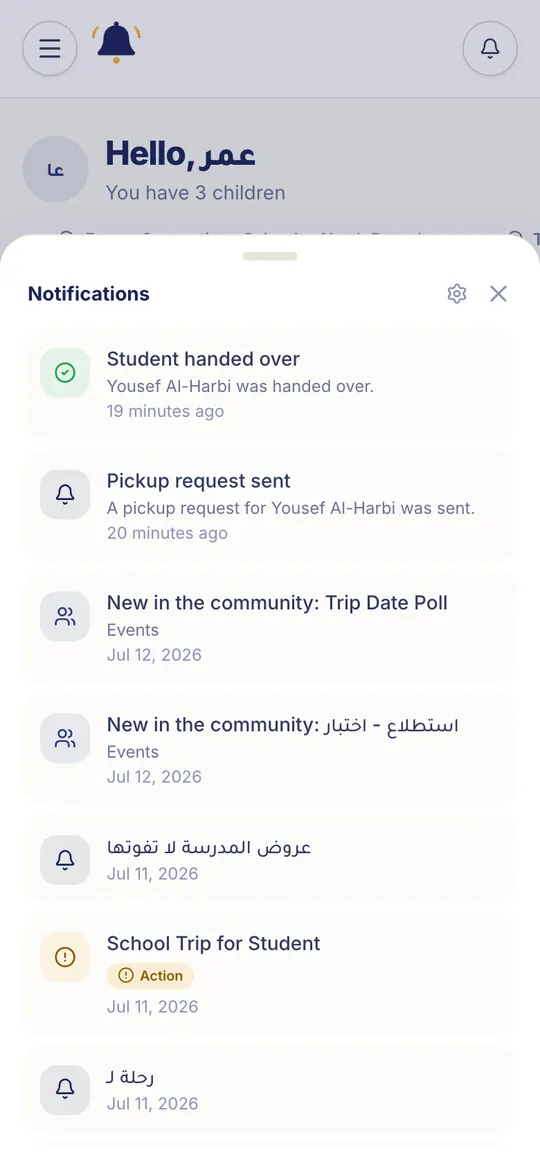
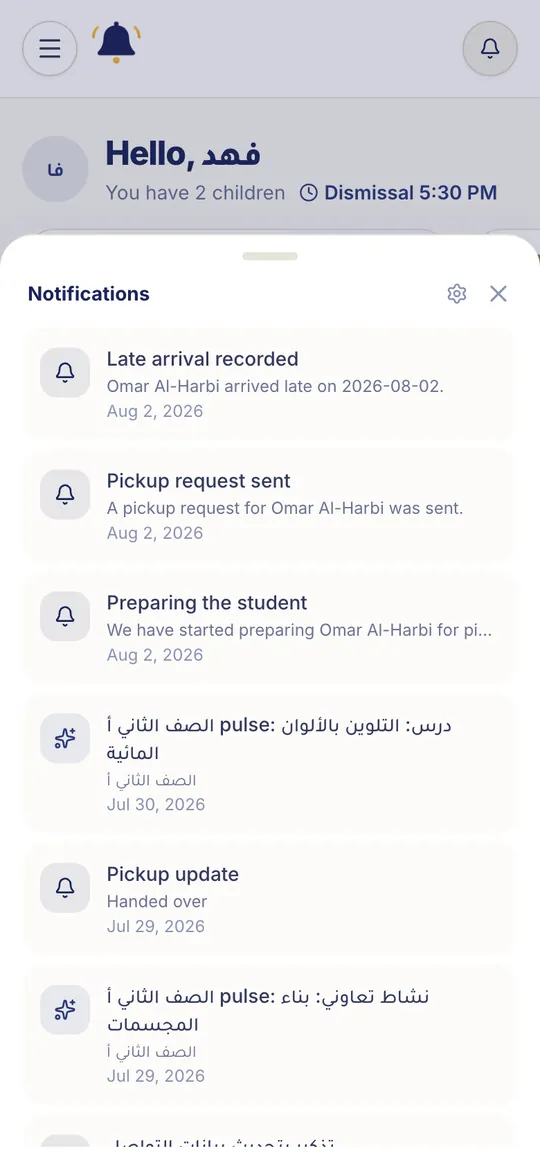
You are notified at every important step: request sent, preparing, handed over, absences, school messages and more.
- Tap the bell at the top of the screen to see all your notifications.
- From the gear in the notifications panel, or menu → “Notification settings”, you control phone alerts.
- Turn on “Send alerts to my phone” and allow notifications for JARASNA in your phone settings — both are needed.
- “Quiet hours”: a period when non-urgent alerts wait until it ends. Use the school’s default hours or set your own.
- “Alert types”: choose what reaches you from each category.
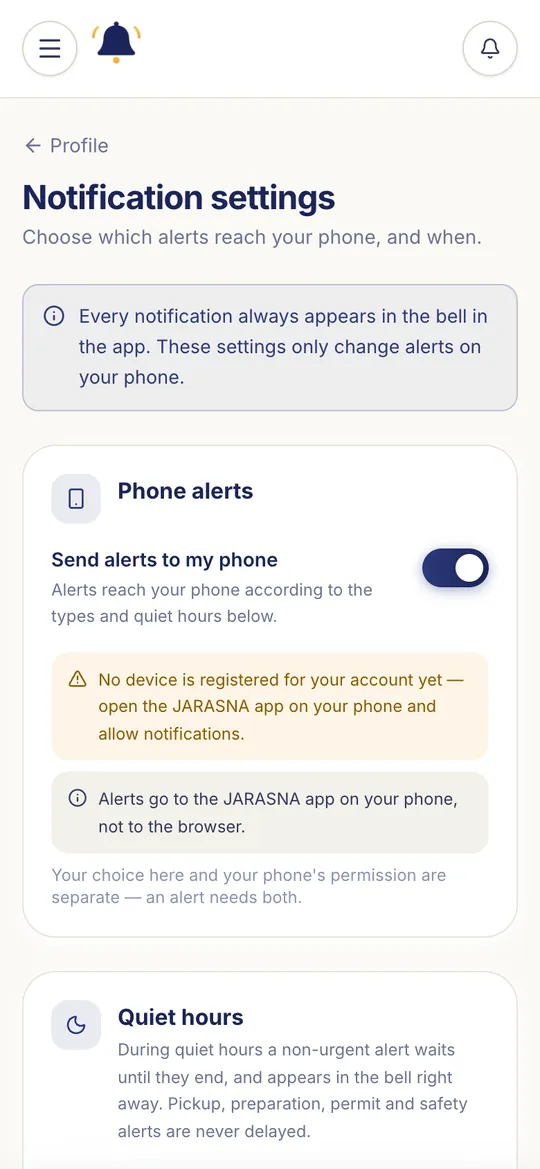
Good to know: Pickup and safety alerts cannot be turned off and always reach you, even during quiet hours. Every notification also stays in the in-app bell.
Your profile, security and support
Manage your photo, email and password, and get help whenever you need it.
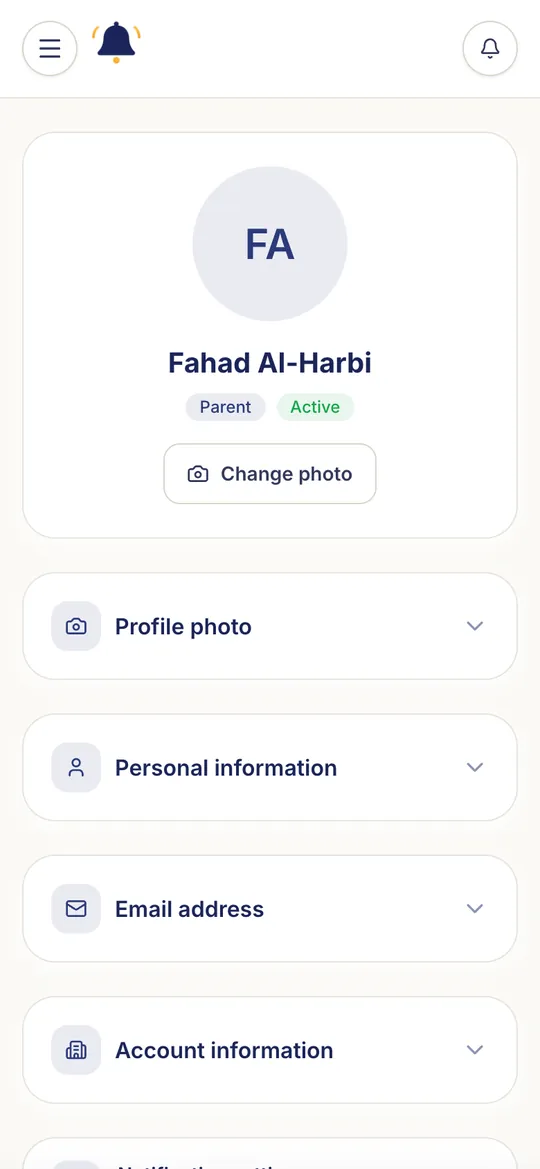
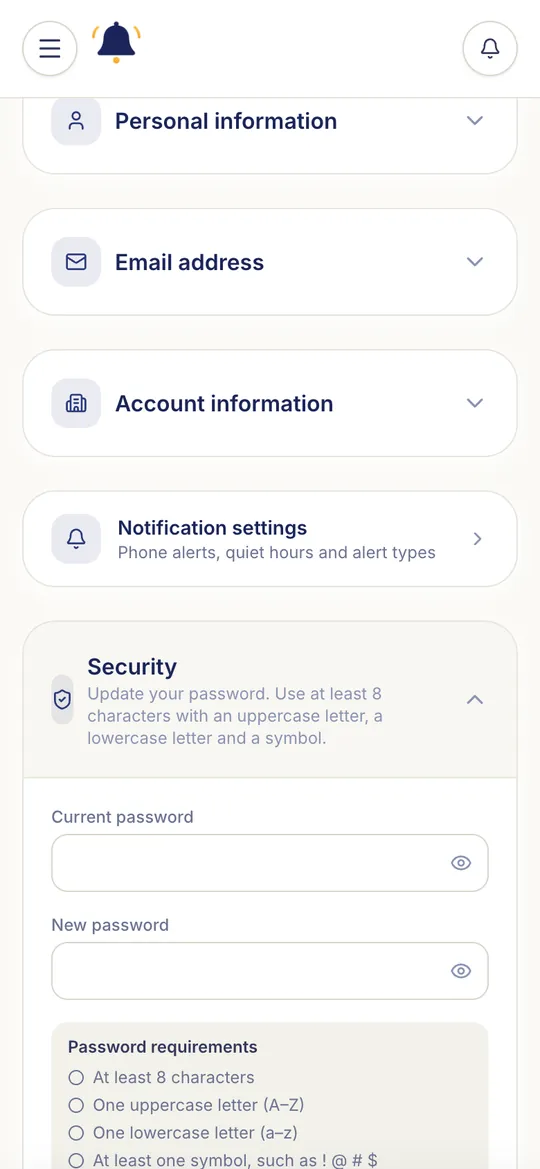
- Menu ☰ → “Profile Settings”: change your photo (JPG, PNG or WEBP up to 2 MB) and add or change your email.
- Your name and mobile number are managed by the school; contact them to change these.
- “Security”: change your password by entering the current one, then the new one twice, with an SMS check.
- Language: menu → “Language”. The app supports Arabic, English and other languages.
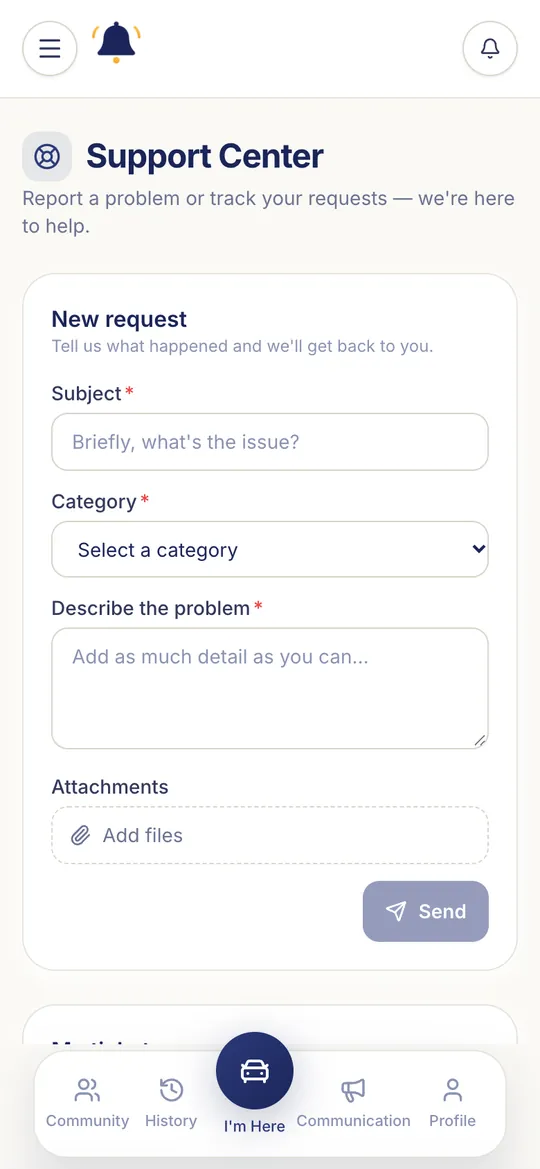
- “Support Center” from the menu: pick a category, write the subject and problem, attach files if needed, then “Send”. Follow our replies in “My tickets”.
- “Delete Account” at the bottom of your profile: the account is deactivated at once and permanently deleted after 14 days; signing in during that time restores it.
Frequently asked questions
I didn’t receive the verification code. What should I do?
Wait 60 seconds, then tap “Resend”. Make sure it is the number registered with the school and that your phone can receive SMS.
The “I’m Here” button doesn’t work.
Read the text on the button: pickup may not have started, the school may be waiting for attendance, or you may need to select your approved car. If location is requested, allow it and make sure you are near the school.
My children attend two different schools. Do I need two accounts?
No. One account with your mobile number brings all your children together, with the school and branch shown above each card.
Who else can pick up my child?
The other guardian, the permanent receivers you add, and anyone you issue a one-time temporary permit to.
Does the app track my location?
No. If your school uses the location check, your location is read once, only when you tap “I’m Here”; it is not stored or tracked in the background.
I want to change my mobile number or name.
These details are managed by your school; contact the school administration to change them.
We’re here to help: For help in the app: menu ☰ → “Support Center”. For questions about your child’s data or pickup settings, contact your school administration.
Get the app
The JARASNA app is free for parents on all three stores, and you can also use it in a browser at app.jarasna.com.